Face shape guideClipper & scissor technique3 real salon videos
Whether you're heading to the barber for the first time in months, learning to cut at home, or just want to understand what's actually happening in the chair — this guide has you covered. After 25 years in the salon, RaDona knows exactly what separates a great men's haircut from an average one: preparation before the cut, communication at the chair, and the blending technique that makes any style look professional. All of it is here, with three real salon videos showing the technique in action.
The Right Tools Make the Difference
Sharp scissors, quality clippers, and the right guards — the foundation of every clean men's cut.
Cut & Style — The Complete Process
The complete barber's workflow: consultation, cut, blend, finish. Each step matters as much as the last.
Watch: RaDona's Mens Haircut Tutorials
Three videos from the channel — the main tutorial, a short faded cut on a real client, and a boys' cut that uses the same foundational technique. Watch them in order for the clearest progression from basic concept through execution.
PRIMARY
Mens Haircut Tutorial
The main tutorial for this page — RaDona walks through the complete men's haircut from consultation through the finished result. Watch this first.
TECHNIQUE
Short Fade — Real Salon Cut
RaDona cuts a short faded style on a real client — the #2 clipper, scissor blending, and neckline clean-up all clearly visible. Full guide at the short fade tutorial.
BOYS CUT
Boys Haircut & Style
Same foundational technique applied to boys' and young men's hair. The clipper and scissor work transfers directly — same methods, slightly shorter sitting time.
Before the Appointment: Find Your Style & Know Your Face Shape
The single most common source of disappointment after a men's haircut is miscommunication before the scissors come out. Two minutes of preparation before you sit down eliminates 90% of haircut regret.
1. Find Inspiration — and Bring a Photo
Before going to your barber, have a few style ideas in mind. Browse online, look at the videos above, or screenshot a style you've seen that you like. A photo takes 10 seconds to show and eliminates almost all ambiguity. Describe what you like about the photo — the length on top, the fade level, the texture — so your barber knows which aspects to replicate, not just the overall shape.
2. Know Your Face Shape
Face shape
Best approach
What it does
Avoid
Oval
Any style — most versatile
Natural proportions; anything flatters
Nothing strictly off-limits
Round
Height at crown + close sides (mid or high fade)
Vertical emphasis elongates a round face
Close buzz all over — maximises roundness
Square / strong jaw
Mid fade + textured messy top; soft finish
Texture softens strong angular features
Flat top or very close sides — emphasises jaw width
Oblong / long
Medium length all over; avoid extra crown height
Horizontal width balances a long face
High fade + tall quiff — adds vertical length
Heart (wide forehead)
Mid fade + textured fringe
Textured fringe reduces visual forehead width
Skin fade + slicked back — exposes wide forehead
Diamond
Low fade + layered top with side texture
Width at sides balances narrow forehead and jaw
Very short all over
At the Barber: How to Communicate What You Want
Barbers are professionals — but they're not mind readers. The more specific your communication, the closer the result is to what you pictured. Use these exact phrases for each part of the haircut.
The sides and back
"
Low / mid / high fade" — the position where the fade begins (low = near ear, high = near temple)
"
#2 on the sides" (or whatever guard) — specific guard numbers eliminate guesswork
"
Skin fade" or "taper" — skin fade goes to near-zero; taper blends more gradually
"
Hard part" — a razor-cut line at the side part if you want a defined separation
The top
"
Leave [X] inches on top" — be specific; always ask to keep more than you think you need
"
Textured top" — point-cut for movement and texture (vs. blunt-cut which is flat)
"
Scissor on top" — for longer, more controlled top sections
"
Connect the sides to the top gradually, no hard line" — requests a blended transition
The neckline
"
Follow my natural hairline" — don't create a straight artificial line
"
Square neckline" or "tapered neckline" — square is crisp and defined; tapered blends out
"
Line up the edges" — sharp edge along hairline, temples, and sideburns
The one thing that helps most
Show the barber a photo from the front and from the back. Two photos takes 15 seconds and communicates more than 5 minutes of description. Even a screenshot from the videos on this page will do — point to exactly the fade level, the top length, and the neckline shape you want.
Clipper Guard Number Reference
Every men's clipper cut starts with a guard number. The guard controls how much hair the clipper leaves behind. Every number equals 1/8 of an inch — simple once you know it.
#0 / #0.5
Blade only
Near-skin close. Skin fades and neckline clean-ups. Very striking — do not start here for a first cut.
#1
1/8 inch
Very short. Used at the base of a low fade. Scalp shows. Common in high contrast fades.
#2
1/4 inch · Most used
The most common sides guard. Short and masculine without being a skin fade. Used in the tutorial video above.
#3
3/8 inch
The blend guard. Used in the transition zone between the shorter sides and the longer top.
#4
1/2 inch
Medium short. Mid-section of a mid fade, or a short all-over buzz cut style.
#6
3/4 inch
Medium length. Sometimes used on top for shorter all-over cuts, or as the long end of a clipper-only cut.
#8
1 inch
Longer clipper length. Used for the top in a full clipper cut, or as the longest guard in a taper series.
✂️
Scissors
Top section cut with scissors for more precise length control and a natural, textured finish.
The Haircut Technique: What to Watch For
Understanding the technique helps you follow the videos above and know whether your barber is doing it correctly. These are the key stages in any good men's haircut.
1
Clipper the sides and back — start with a longer guard
Starting at the nape on one side, the clipper moves upward against the direction of hair growth in smooth, consistent passes. Always start with a guard longer than you intend the final result to be — you can remove more on a second pass, you can never put it back. Work around both sides and the full back before moving to the transition zone.
2
Create the fade — the transition between close sides and longer top
Switch to a shorter guard (or the next guard down) for the transition zone where the sides meet the top. Use a flicking motion — angle the clippers outward and flick the end of the guard away from the head as you reach the top of the clipped section. This gradual taper is the fade. Done correctly, there should be no visible line between the short sides and the top. Watch the technique video above — the motion is much clearer to see than to read.
3
Scissor-over-comb blend — removes the remaining line
Even after clipper blending, there's often a faint line at the top of the fade. Combing small sections upward and point-cutting across the transition zone with scissors removes this final line. The comb lifts the hair away from the head; the scissors cut only the tips that extend above the comb teeth. This scissor-over-comb step is what separates a barbershop finish from a home haircut. It's the most important technique to observe in the videos.
4
Scissors on top — comb-and-cut method
The top section is cut with scissors using the comb-and-cut method: comb a section upward, hold between two fingers, cut across. Whatever extends above your fingers is removed. Work front to back in consistent sections. For a textured finish, point-cut (angle scissors vertically into the ends) rather than cutting straight across — this removes the blunt edge that makes shorter styles look stiff.
5
Clean the neckline
Remove the guard and use the clipper blade directly (or a small trimmer) to clean the neckline. Follow the natural hairline growth pattern — natural hairlines curve and often have a natural point; forcing a straight horizontal line looks artificial and grows out unevenly. Clean around the ears and along the sideburns. The neckline is the detail that makes the difference between a finished haircut and an unfinished one.
6
Dry, check symmetry, adjust
Blow-dry in the direction the hair will be worn and check the shape while dry — this is the true finished state. Check both sides against each other from the front, check the back with a hand mirror. Any final adjustments are made dry. Remove the cape and check one more time before the client stands — corrections at the chair take 2 minutes; corrections after the client has stood up require the whole setup again.
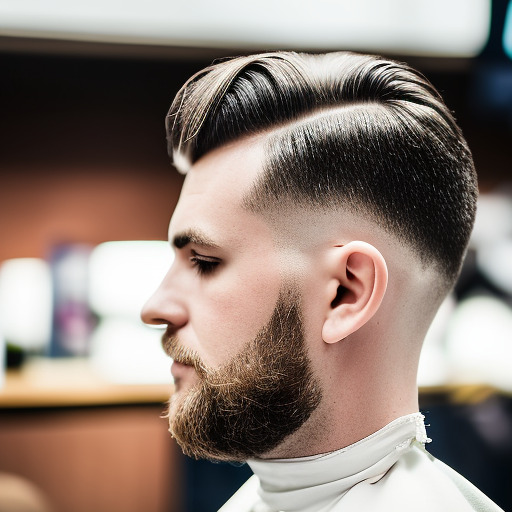
Understanding Fade Types
📍
Low Fade
Begins just above the ear and neckline — the subtlest fade position. Conservative and professional. Grows out cleanly and looks intentional for 3–4 weeks. Best for work environments, first fades, or anyone who wants a classic rather than dramatic contrast.
Conservative · 4-wk touch-up
⭐
Mid Fade
Begins at the temple — the most popular men's fade position. Creates a strong contrast between sides and top without being extreme. Works with nearly every top style from quiff to textured messy. The default recommendation for most men.
Most popular · 3–4 wk touch-up
🔝
High Fade
Begins just below the top section — maximum contrast, most dramatic look. Very prominent clipped area. Requires touch-ups every 2–3 weeks to stay sharp. For men who are committed to the barbershop schedule and want the boldest possible statement.
Bold · 2–3 wk touch-up
Maintenance & Styling After the Cut
Even the best haircut requires some daily upkeep and a sensible maintenance schedule. Here's what actually matters.
Maintenance schedule
Style
Touch-up
Skin / high fade
Every 2–3 weeks
Mid fade
Every 3–4 weeks
Low fade / taper
Every 4–5 weeks
Neckline only
Every 2 weeks at home
Longer scissor cut
Every 5–6 weeks
Styling products — matched to finish
MATTE
Clay or matte paste — natural finish, no shine, medium-strong hold. Best for textured and messy styles. A pea-size worked through with fingers.
SHINE
Pomade (water-based) — defined, polished finish. Great for side parts and comb-overs. Apply to damp hair, comb in place. Washes out easily.
LIGHT
Light wax — medium hold, natural sheen. The most versatile. Applies to dry hair, works through with fingers. No re-application during the day.
NONE
No product — a short fade that's been freshly cut looks sharp without any product. If the cut is right, less is almost always more.
Common Mistakes — and How to Avoid Them
❌ Cutting too much off immediately
Always start longer than you think you want. With clippers, begin one guard longer than your target and take more off on a second pass if needed. You cannot put hair back.
❌ Skipping the scissor blend step
The clipper blending alone is never enough — there's always a remaining line. The scissor-over-comb pass (Step 3 above) removes it. Skipping this step is the most common reason home haircuts look unpolished.
❌ Cutting dry hair with scissors
Scissors on completely dry hair create split ends and produce an uneven cut because the strands don't lie flat. Keep hair damp with a spray bottle through the scissor stages — dry fully after to check the finished shape.
❌ Not checking the back
The back of a men's haircut is the most likely area to be uneven — and the least visible to the client. Always use a hand mirror on the back before removing the cape. Corrections after the client stands up require the full setup again.
❌ A forced straight neckline
Natural hairlines curve — they rarely go straight across. Forcing a perfectly horizontal neckline looks artificial, grows out unevenly, and is one of the clearest signs of a home cut. Follow the natural growth pattern.
❌ Using dull scissors
Dull scissors push hair rather than cut it — they bend strands and create a ragged, broom-like finish regardless of technique. Use proper barber scissors (not kitchen scissors) and replace or sharpen them annually.
how to mens haircut, guy haircut tutorial, mens hair cutting tutorial, mens haircut tutorials, steps haircut, mens hair tutorial, men hair tutorial, male hair tutorial, guy hair tutorial, step haircut mens, men hair style tutorial
The Ultimate Guide to Men's Haircuts
In this comprehensive guide, we aim to empower men with the knowledge and skills to achieve their desired haircut from the comfort of their home. Whether you're looking to maintain a classic style or experiment with the latest trends, this tutorial covers everything from basic techniques to advanced styling tips.
Understanding the fundamentals of men's haircuts is essential for anyone looking to enhance their grooming routine. This guide will provide insights into various haircut styles, tools needed, and the step-by-step process to ensure a successful outcome every time.
Essential Tools for Cutting Men's Hair
Before you begin your haircutting journey, it's crucial to have the right tools at your disposal. Essential items include sharp scissors, clippers with various guard sizes, a comb, and a mirror for checking your progress.
Investing in quality tools not only makes the haircutting process easier but also ensures a clean and professional-looking finish. For instance, using clippers with adjustable blades allows for versatile styling, while a good pair of scissors can help achieve precise cuts for longer hairstyles.
Common Haircut Styles for Men
Men's haircuts come in a variety of styles, each suited to different face shapes and personal preferences. Popular options include the buzz cut, fade, undercut, and pompadour, each offering a unique look and feel.
Choosing the right style involves considering factors such as hair texture, maintenance level, and how well the cut complements your facial features. For example, a fade works well for those with thicker hair, while a pompadour can add height and volume to finer hair types.
Tips for Maintaining Your Haircut
After achieving the perfect haircut, maintaining it is key to ensuring it looks great over time. Regular trims every 4-6 weeks can help keep your style fresh, while using the right hair products can enhance texture and hold.
Additionally, learning how to style your hair daily can make a significant difference. Whether you prefer a natural look or a more polished finish, using products like pomade or wax can help achieve your desired outcome while keeping your hair healthy.
Understanding Hair Growth Patterns
Every individual's hair grows differently, and understanding your hair growth pattern can significantly influence your haircut choices. Factors such as growth direction, thickness, and natural wave can affect how a haircut sits and looks.
By recognizing your unique hair characteristics, you can choose styles that work with your natural growth, rather than against it. For instance, if your hair grows forward, opting for a style that accommodates this can lead to a more manageable and flattering look.